After purchase
Once you have made the purchase of the Cartzilla you will find it available for download in your ThemeForest Downloads page. Click on Download and you will a dropdown will popup with following options :
- All files & documentation – This is the full download package. Its a zip file and will be named like this Cartzilla-v1.0.0.zip. We recommend downloading this file if you are installing the theme for the first time. Please note that this zip file is not the theme file and should not be uploaded to WP. If you upload this zip file, you will get missing stylesheet error.
- Installable WordPress file only – This is the installable WordPress file. We recommend downloading this file if you are updating the theme. This file is named cartzilla.zip. This file is also contained within front-v1.0.0.zip inside
- License certificate & purchase code (PDF) – Contains the license certificate and purchase code in PDF format.
- License certificate & purchase code (text) – Contains the license certificate and purchase code in txt format.
We recommend that you download All files & Documentation (the entire package) however you can simply download installable WordPress file only if you just want the WP theme file.
Heads Up! If you try to install the full package zip file you will get Theme is missing the style.css stylesheet error. You should unzip the package and use cartzilla.zip inside the theme-files folder of the unzipped full package.
The Download Package
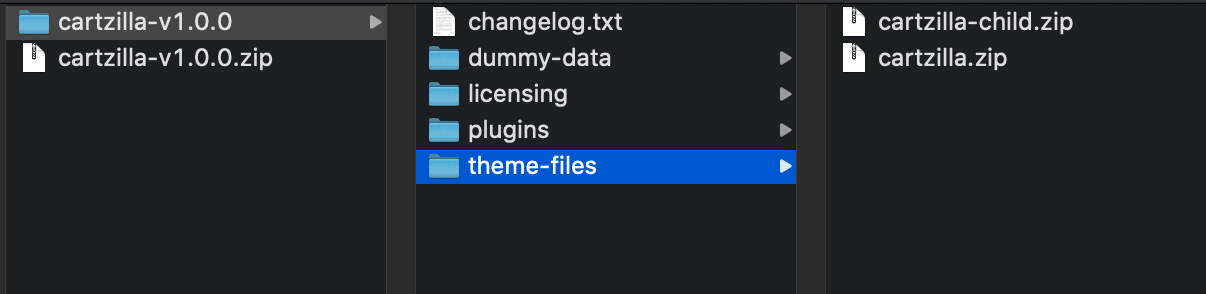
If you have downloaded All files & documentation, a file named cartzilla-vx.x.x.zip is downloaded x.x.x will point to the version of the theme.
The zip file cartzilla-vx.x.x.zip contains :
- theme-files
- cartzilla.zip – The actual theme file that should be upload to your WordPress website.
- cartzilla-child.zip – The child theme which should also be uploaded after cartzilla.zip which is the parent theme
- dummy-data
- main/dummy-data.xml – Dummy data for Main Demo
- main/customizer.dat – Customizer options for Main Demo
- main/widgets.wie – Widgets for Main Demo
- main/wpforms – Wpforms used for Main Demo
- electronics/dummy-data.xml – Dummy data for Electronics Demo
- electronics/customizer.dat – Customizer options for Electronics Demo
- electronics/widgets.wie – Widgets for Electronics Demo
- electronics/wpforms– Wpforms used for Electronics Demo
- marketplace/dummy-data.xml– Dummy data for Marketplace Demo
- marketplace/customizer.dat– Customizer options for Marketplace Demo
- marketplace/widgets.wie– Widgets for Marketplace Demo
- marketplace/wpforms– Wpforms used for Marketplace Demo
- grocery/dummy-data.xml– Dummy data for Grocery Demo
- grocery/customizer.dat– Customizer options for Grocery Demo
- grocery/widgets.wie– Widgets for Grocery Demo
- grocery/wpforms– Wpforms used for Grocery Demo
- helpcenter/dummy-data.xml– Dummy data for Helpcenter Demo
- helpcenter/customizer.dat–– Customizer options for Helpcenter Demo
- helpcenter/widgets –Widgets for Helpcenter Demo
- licensing – This folder contains various licensing files of plugins and open source code used by the theme.
- Plugins
- cartzilla-extensions.zip – Cartzilla Extensions Plugin
- cartzilla-gutenberg-blocks.zip – Cartzilla Gutenberg Blocks Plugin
- changelog.txt – This file contains the log of latest releases.
Installing the theme
Installing the theme can be done in two ways. You can upload the theme ZIP file using the built in WordPress theme upload, or copy the files through an FTP client.
Using WordPress Theme Upload
- Login to your WordPress admin.
- In the Appearance > Themes menu click the tab Install Themes
- At the top of the page click, Upload, then click the file input to select a file.
- Select the zipped theme file, “cartzilla.zip” available in ThemeFile folder from the package downloaded from ThemeForest, and click Install Now
- After installation you will receive a success message confirming your new install.
- Click the link Activate
Uploading by FTP
- Login to your FTP server and navigate to your WordPress themes directory.
- Normally this would be wp-content/themes
- Extract the files from the zipped theme available in the package downloaded from ThemeForest.
- Copy the folder cartzilla to your themes directory.
- After the files finish uploading, login to your WordPress admin.
- In the Appearance menu click Themes
- Click Activate for the theme Cartzilla
Installing the child theme
cartzilla-child.zip file is the child theme file and can be found inside the theme-files folder within unzipped download package.We highly recommend the use of child themes. The additional step involves repeating steps 1 to 7 for cartzilla-child.zip file
Installing Plugins
- After you have activated your theme, you’ll see a notice about required plugins for Cartzilla, to proceed click “Begin installing plugins”.
- On clicking on it, you will be redirected to Install Required Plugins Page. Alternatively this page can be accessed from Appearance > Install Plugins as well.
- You will now see a list of plugins required and recommended for use with this theme. Click on the Select All checkbox to select plugins.
- Click on Bulk Actions dropdown menu, choose Install dropdown option and click the Apply button.
- If all plugins are installed successfully, you will be redirected to WP Plugins page.
- In case you encounter any problems, try installing theme one by one.
- After you have installed all the plugins, activate them by navigating to Plugins page, select the required plugins, choose activate from the dropdown option and click on Apply button.
You have now successfully installed and activated the plugins required for Cartzilla WordPress Theme.